Have you been searching for just the right print, with the right color combination for your next sewing project? Scoured through all the fabric websites, local fabric stores and even local yard sales? Frustrated after all that searching and only finding something similar, but in the wrong color or fabric? Believe me I have been there! More times that I care to remember! What is more frustrating is that I saw just the item I wanted only weeks before, but now it is nowhere to be found! After confronting this issue several times, I decided to try making my own printed fabric. I had been searching for a navy blue printed toile, for a roman shade that I wanted to make for my Dinning room window, The only blue I could find was not navy but a teal blue and on an ecru background, when I wanted a white background. So I purchased the white fabric for the shade, cut it and sewed it together, then went to search through my rubber stamp collection. I found a set of stamps very similar to a toile pattern, poured some navy blue acrylic craft paint into a disposable plastic plate and began to play. I started with a scrap piece of the fabric used for the shade and started testing how best to achieve the look I wanted. I was very happy with the results as were my family and friends, who could not believe that I had done the printing as well as the window treatment.
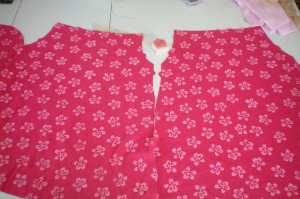
A few months later, a friend wanted Umizoomi costumes for her son and daughter for a birthday party. Well Geo is easy just solid colors, but the girl – Milli has a specific flower pattern with light pink on a darker pink background. Well of course there was nothing similar to be found, so I went searching through my rubber stamps and found one that would work. This is how I prepared the material:
* Wash and dry material
* cut out all the pattern pieces
it is less time-consuming to “print” just these pieces rather than all of the fabric
* Lay out all the pieces flat on top of freezer paper or wax paper in case any paint bleeds through.
* I mix the color of acrylic craft paint with a fabric medium according to instructions on the bottle.
* Pour the mixed paint and medium into a disposable plastic plate that has a large flat surface.
* Test your technique on a scrap piece of the same fabric you will be printing.
* Use enough paint to cover the surface of the stamp but not to run down into the crevices
* Try varying the pressure you apply when stamping down onto your fabric
* Remember to bring your stamp straight up and down onto and off of the fabric
* Once you have your technique down, you are ready to print on your pieces
* I start in the center and work my way out, even overlapping on some edges
* Once all the pieces are printed, I leave them to dry for several hours.
* Using a pressing cloth and dry iron on the hottest setting your fabric can take,
iron the wrong side
of the fabric to set the paint.
* Now you are ready to assemble your project.
I enjoyed this process so much that I am constantly looking for more projects that I can print myself!
I guarantee that if you try it, Not only will your family and friends be impressed by the project you made but in awe of YOUR handmade printed fabric!
Kerry


Oh man, I might just be in love with you!! My daughter is a RABID FAN of Milli (and everything Umizoomi) and wants to be Milli for Halloween. I am so glad I found your blog!
Its actualy very fun to do! My daughter did help me with the Roman shade.
Thank You! I was very happy with how this turned out!!!
I love this idea! I don’t own any rubber stamps, but this might be a reason to get some!